
Jellyfin is the volunteer-built media solution that puts you in control of your media. Stream to any device from your own server, with no strings attached. Your media, your server, your way.
Jellyfin can be installed in many ways:
- On a physical or virtual Linux computer
- Used in something like CasaOS
- As an application in TrueNAS SCALE
These instructions will show how to install Jellyfin on a TrueNAS SCALE computer. Usually a NAS has plenty of space and is on most of the time so this makes for a good starting point.
https://www.truenas.com/docs/scale/scaletutorials/apps/communityapps/jellyfin/
- In TrueNAS, create a new user (Credentials, Users). I called mine jellyfin just to keep it simple.
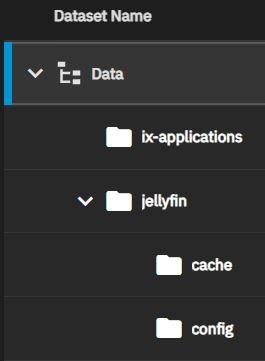
- Create a Dataset for Jellyfin to use to store it’s media. Click on Datasets. If you want to create a new dataset from unsued space you can. Otherwise single click on an an existing dataset and click on “Add Dataset”. I called mine “jellyfin”.
- Create two more datasets under the first dataset. Call one “cache” and the other “config”.
Your Datasets should look like this:
Now we will make the needed folders for Jellyfin. On the TrueNAS server, select “Systems Settings” and “Shell”, and run the following commands. Change “Data” to the name of the Dataset you used.
1
2
3
cd /mnt/Data/jellyfin
mkdir Movies Music cache config
chown -R jellyfin:root Movies Music cache config
- Now go to Apps. Click on “Discover Apps” and search for Jellyfin and click on it.
- Click on Install Instance.
- This is the hardest part. I will try to make this easy for you.
- Application name should be “jellyfin”.
- User ID and Group ID should be a number. This is the user inside of the container, not in the TrueNAS OS.
- Under Network Configuration, check the box for “Host Network”. This exposes the Jellyfin instance to the local network.
- Under Storage Configuration, for Jellyfin Config Storage, select “Host path”. For the Host Path, browse to “/mnt/Data/jellyfin/config”.
- Under Storage Configuration, for Jellyfin Cache Storage, select “Host path”. For the Host Path, browse to “/mnt/Data/jellyfin/cache”.
- For “Jellyfin Transcodes Storage”, select “emptyDir” unless you will be doing a lot of transcoding.
- Now we add the storage that is used to store your media files. Under Additional Storage, select Host Path and set it to “/mnt/Data/jellyfin/Media”
- Under Resource Configuration, you should be able to leave the settings as their defaults.
- Click on Save at the bottom of the page.
- You will be taken back to the Apps page. your instance will say “Deploying” and finally “Running”.
Using your method of transfering files, copy your Movies to the TrueNAS folder “/mnt/Data/jellyfin/Media/Movies”. Copy your Music files to “/mnt/Data/jellyfin/Media/Music”.
- Now back on the TrueNAS SCALE server, click on Apps and single click on Jellyfin. In the right pane click on “Web Portal”.
- Another browser tab will open. This is the Jellyfin agent or user window. Nothing will show yet because we have to set up the Libraries.
- Click on the hanmburger stack (menu) in the upper left cormer. Select Dashboard under the Administration item. This will open the Administrators panel.
- Select Libraries. Click on “Add Media Library”. Select the Content type you will be adding to this library. Type in a Display name” If this library is for movies, type in something like “Movies”.
- Click on the plus sign next to “Folders”.
- Browse to the folder where your stored you movies. It will start with “/Media” and then the Movies folder.
- Click OK.
- You should see a “Movies” tile” now.
- Add another media library for your music and repeat the steps.
As the media files are being added to Jellyfin, the pictures and metadata will be added automatically.
Now start up your Jellyfin client amd select your new Jellyfin server. I use an Android phone and a Roku box. If you don’t have a Jellyfin client, install one.
NOTE: If no media files appear in your client, you may have to run the following command in your TrueNAS shell:
1
2
cd /mnt/Data/jellyfin/Media
chown -R jellyfin:root Movies Music cache config
Enjoy.